Wednesday, December 10, 2014

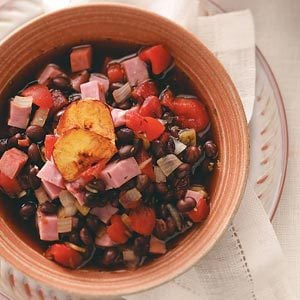
Ham and Black Bean Soup

Hello again! I'm so sorry that it has been so long. I'll spare you my excuses, just know i'm back.

We always buy a turkey and a ham this time of year and have one main meal and then LOTS of leftover meals with the meat. So, the ham was cooked and thoroughly enjoyed last weekend and now we are onto the leftover meals.

Enter: Ham and Black Bean Soup

Usually I am not a huge fan of Ham and Black Bean Soup. I think it's a texture thing. This recipe, however, blew me away. I thought it was absolutely delicious, my husband thought it was delicious and my in-laws gave a ringing endorsement as well.

source

Enjoy!

3 cans (15 oz each) black beans, rinsed and drained
28 oz. beef broth. - I use Beef Better than Bouillon
1 can (14.5 oz.) diced tomatoes, undrained
2+ Cups cubed, fully cooked ham (or to taste)
1/2 cup green enchilada sauce, mild
1/4 cup red wine vinegar
1 large onion, chopped
3 garlic cloves, minced
1 teaspoon dried oregano
1 tsp dried thyme
1 tsp pepper
salt to taste

Combine all ingredients in a large pot and bring to a boil. Turn temperature to low and simmer for 3+ hours.
Delicious served with Biscuits Supreme.
Recipe based off Taste of Home.

Just a tip: Leftover soup was just as delicious!

Biscuits Supreme, Better Homes and Gardens

Better Homes and Gardens red and white checked cookbook is my absolute go-to when I need a new recipe, or anything else cooking related. Especially their biscuits. They are soft, fluffy, buttery and divine. Make them and do a quick taste test. Let me know!


2 cups flour (white, wheat or half and half. They all work)
2 tsp sugar
1 Tbsp baking powder
1/2 tsp cream of tartar 
1/4 tsp salt
1/2 cup butter, margarine or shortening
2/3 cup milk
source

Preheat oven to 450

Combine dry ingredients. Cut in butter till mixture resembles coarse crumbs. Make a well in the center. Add 2/3 cup milk all at once; stir until moistened.

Turn dough out onto a lightly floured surface. Quickly knead dough by gently folding and pressing dough 10-12 strokes or till nearly smooth. Pat or lightly roll dough to 1/2 inch thickness. Cut dough with a 2.5 inch biscuit cutter.

Place biscuits 1 inch apart on an ungreased baking sheet.  Bake for 10-12 minutes or until golden brown. Serve hot. Makes 10 biscuits

Tuesday, April 8, 2014

Beer Bread

This recipe is straight from Food.com. I wish I could claim this concoction as my own because it is DELICIOUS but I can't. I can't even claim that it's based off another -- don't change anything! It is perfect just as it is! and the best part, minus cooking, it takes a total of 3 minutes and 1 bowl! Easy Peasy.

I don't drink alcohol so I never have beer in my fridge. For this, however, I bought a 6-pack and thoroughly enjoyed every last drop in this bread. (For those like me who don't drink, the alcohol cooks out but the flavor and the yeast are important. Yes, you can use a non-alcoholic liquid but make sure you use yeast or you'll get something resembling a large pancake as thick as your pan.)

I served a mission for The Church of Jesus Christ of Latter Day Saints in Ireland several years ago. So, this past month, (while feeling slightly homesick for my Ireland with St. Patrick's Day and all) I made lots of food that reminded me of those few years almost a decade ago. SO...choose any beer you want, I chose Guinness. Because how much more Irish can you get?!

AND...just a quick side note that is VERY IMPORTANT...THIS MAKES THE ABSOLUTE BEST FRENCH TOAST EVER!!! Make at least two loaves, one to eat for dinner and one for a french toast breakfast! (I would recommend more than two, just sayin'. It's that good.)

{Ingredients}
  • 3 cups flour (sifted)
  • 3 teaspoons baking powder (omit if using Self-Rising Flour)
  • 1 teaspoon salt (omit if using Self-Rising Flour)
  • 1/4 cup sugar
  • 1 (12 ounce) cans beer
  • 1/4 cup melted butter (the original recipe calls for 1/2 cup but that felt excessive to me, 1/4 was plenty)  
 {Directions}
  1. Preheat oven to 375 degrees.
  2. Mix dry ingredients and beer.
  3. Pour into a greased loaf pan.
  4. Pour melted butter over mixture.
  5. Bake 1 hour, remove from pan and cool for at least 15 minutes.
  6. ***UPDATED NOTES: This recipe makes a very hearty bread with a crunchy, buttery crust. If you prefer a softer crust (like a traditional bread) mix the butter into the batter instead of pouring it over the top. (leave it crunchy! trust me)
  7. Sifting flour for bread recipes is a must-do. Most people just scoop the 1 cup measure in the flour canister and level it off. That compacts the flour and will turn your bread into a "hard biscuit" as some have described. That's because they aren't sifting their flour! If you do not have a sifter, use a spoon to spoon the flour into the 1 cup measure. Try it once the "correct" way and you will see an amazing difference in the end product.
  8. I have had many email from you kind folks about using non-alcoholic beverages instead of beer. That is fine to do but I highly recommend adding a packet of Dry Active Yeast or 2 teaspoons of Bread (Machine) Yeast so that you get a proper rise.
  9. The final result should be a thick, hearty and very tasteful bread, NOT A BRICK! ;).
 (These directions/notes are taken directly from HERE.)

I'd love to know what you think! Hope you enjoy it as much as I do!
source

Wednesday, November 27, 2013

Thanksgiving Turkey and Stuffing

Happy Thanksgiving again! Can you all hardly wait for those delicious traditions to happen again? I love Thanksgiving. The family, the food, the shopping in the middle of the night...it's just a fun holiday.
So, for those who don't have their final plans for the turkey and stuffing here is your last stop. This is delicious (tried and true) and turns out beautifully. 


 I hope everyone enjoys their holiday this weekend. And good luck with whatever part of the feast you are in charge of!!!


*Side note: For those who are appalled by cooking the stuffing OUTSIDE the turkey -- be warned. (Dad!) You will be directed to do so. If you cook the turkey stuffed you will almost for sure overcook your turkey or under-cook your stuffing. If stuffing is undercooked it can be a fabulous place for food poisoning. If you overcook your turkey it gets dry. Lose-lose. So here is the trick. Cook your stuffing outside of your turkey (*GASP*) and cook your turkey until it is perfectly done. Have your stuffing ready so that the second the turkey comes out, you can stuff the turkey. In the 15-20 minutes that the turkey needs to sit the stuffing will absorb the juices from the inside of the turkey that would otherwise be wasted during carving. This will give it that yummy turkey flavor. It works. We tried it. DO IT! (And don't judge me for this tip, just sayin')


 {Ingredients}
1 10-14 lb. Turkey (completely thawed)
1 cube (1/2 cup) butter
2 tsp. Kosher salt
1/2 tsp. ground black pepper
1 tsp. rosemary leaves
1 tsp. thyme leaves
1 tsp. granulated garlic
1 tsp. ground sage
2 tbsp. olive oil
2-3 cups prepared stuffing

  • Melt the butter
  • Add  salt, pepper, rosemary, thyme, garlic and sage to the melted butter. Stir together well.
  • Using your hand and/or a paring knife, separate the skin of the turkey from the body of the turkey, leaving the skin intact.
  • Spread the butter mixture between the skin of the turkey and the body of the turkey, covering thoroughly.
  • Brush the skin of the turkey with olive oil.
  • Roast the turkey in a shallow roasting pan at 325° until the deep thigh meat reaches 180°
  • Remove from oven, stuff immediately with prepared stuffing.
  • Allow to rest for 20-30 minutes before carving.

HAPPY THANKSGIVING!

Cranberry Relish

 Happy Thanksgiving! I know this is a little last minute but this relish is so delicious that it just had to be shared. Cranberry sauce always gets thrown away (at least in my experience) but this stuff is far from trash worthy! So, enjoy your feast and try this out this year. You won't be sorry.


{Ingredients}
1 Cup whole cranberries
peel of 2 clementine oranges (or one large orange)
1/3 C water
1/4 C sugar

{Directions}
Blend all ingredients. Easy Peasy!
Serve with your turkey and all the fixings.

Enjoy!


Wednesday, October 30, 2013

Panzanella With Chicken, Crisp Chicken Skin and Capers

Mr Chef loves to read articles. He found this gem and we tried it out. We didn't change anything so I can't claim it as my own. HERE is the original article.

It's absolutely delicious and is definitely on our "repeat" list. Try it out and let me know what you think!!!


{Ingredients}

  • 1 1/4 pounds very ripe tomatoes; a mix of varieties and colors is nice
  • 2 garlic cloves, peeled and smashed
  • 3/4 teaspoon kosher sea salt, more to taste
  • 6 tablespoons plus 1 teaspoon olive oil, more as needed
  • 1 tablespoon lemon juice
  • 1/2 teaspoon Dijon mustard
  • Freshly ground black pepper, to taste
  • 2 cups leftover or rotisserie chicken including some skin (about 1/2 chicken)
  • 1 tablespoon capers, drained and patted dry
  • 1 6-inch length of ciabatta or baguette (about 4 ounces), preferably stale, cut into 1-inch cubes
  • 3 sprigs fresh thyme or 2 sprigs fresh oregano
  • Chopped fresh basil, for serving

Preparation

  1. Cut tomatoes into bite-sized pieces and transfer to a large bowl. Using a large chef’s knife, mince 1 of the smashed garlic cloves. Add a pinch of salt and using the flat side of your knife, smash into a fine paste. Add garlic paste to the tomatoes along with 1/4 teaspoon salt and 1 tablespoon olive oil. Toss to coat and set aside.
  2. In a medium bowl, combine the lemon juice, mustard, 1/4 teaspoon salt and black pepper to taste. While whisking constantly, slowly drizzle in 3 tablespoons olive oil until the mixture is thickened. Remove the skin from the chicken, shred the meat and combine with the vinaigrette. Roughly chop the chicken skin and set aside.
  3. In a 10-inch skillet over high heat, add 1 teaspoon olive oil. When oil is shimmering, add the chicken skin and capers. Cook while stirring occasionally until the skin is crisp and the capers are beginning to brown, about 4 minutes. Transfer to a plate lined with paper towels to drain any excess oil.
  4. In the same pan over medium heat, add 2 tablespoons olive oil, bread cubes, the remaining smashed garlic clove, 1 sprig of fresh thyme or 1 sprig of fresh oregano and 1/4 teaspoon salt. Cook while stirring occasionally until toasted and golden, about 5 minutes. Remove from the heat and cool completely. When cool, discard the garlic and thyme and add bread cubes to the tomato mixture. Add the leaves of the remaining uncooked thyme or oregano, the shredded chicken and toss to combine. Transfer to a platter or individual plates and serve garnished with the capers, chicken skin, chopped basil, and freshly ground black pepper.
YIELD
4 servings

Tuesday, October 1, 2013

Roasted butternut squash curried soup

source

Our garden produced an abundance of DELICIOUS butternut squash this year so i've been experimenting, for the first time, with different ways of cooking them. They are so yummy and are quickly becoming my favorite vegetable.
So, the whole family came down for Sunday dinner this past week and guess who was featured?  Good old Butternut Squash herself! Shocking, i know! ;)

We served this soup in bread bowls and it was so yummy. I would highly recommend that.

Let get right to it, shall we?
Start by roasting your squash, onion, garlic and ginger. We left our squash in the peel, purely out of laziness, and then scooped it out when it was soft. It was really easy that way. Cut the squash into peiices, at least halves, maybe thirds. Cut the onion into quarters and sprinkle the others all over. We roasted for 2 hours. This one is up to you, however. When your squash smells divine and is soft, it's done.
While that is roasting pat your stew beef dry and shake it in flour, garlic, kosher salt and pepper. Brown the meat in a little oil. You don't want your meat all the way cooked, just browned, to add flavor. Make sure your oil is nice and hot before throwing these babies on the pan. Remove the meat from your pan and deglaze the pan with your stock. Scrape it pretty well so you get all the meat that stuck to the pan. (This is usually the best part of the meat.) Place meat and your stock in the crockpot and let them cook while your squash cooks. This will get your broth all delicious and stuff.   When your squash is done puree it in a blender along with the onion and some of the broth. This needs to be done in batches but when it's all smooth it's going to give your soup such a perfect texture, so make sure all the chunks are gone! Add pureed squash/onion/broth to crockpot and add all the remaining ingredients. Let it cook for 2-4 hours on low and serve HOT! This is delicious topped with toasted coconut!
MMM, I bet you know what's for dinner tonight, eh?!

Enjoy, i'd love to hear what you think!

source


{Ingredients}
2 butternut Squash
2 sweet yellow onions
2 Tbsp garlic
1 Tbsp ginger

stew beef -
2 Tbsp flour
1 tsp garlic powder
1 Tbsp kosher salt
1/2 tsp black pepper

6 C beef broth

1 can coconut milk
1/2 C buttermilk
1 Tbsp salt
2 tsp white pepper
2 curry powder (yellow)
2 tsp cinnamon
1/2 tsp nutmeg
1 Tbsp brown sugar

Roasted coconut

{Directions}
Cut squash into halves, thirds or quarters - depending on the size of your squash. Place open faced on cookie sheet. Cut onion into quarters and spread on cookie sheet around squash. Sprinkle squash and onion with ginger and garlic. Roast the butternut squash, onions, garlic and ginger in a 450 degree oven for 2 hours. 
Meanwhile, pat beef dry. Combine flour, garlic powder, salt and pepper in large Ziploc bag. Coat beef with flour mixture, brown meat in a HOT pan. Remove meat and use beef broth to deglaze the pan the meat was browned in. Add the meat and broth to Crockpot and allow to cook on low until squash is done.

When squash is done, scoop squash out of peel and, in batches, puree squash and onions with some of the broth until creamy and smooth. add all back to Crockpot.  Add coconut milk, buttermilk, salt, white pepper, curry powder (yellow), cinnamon, nutmeg and brown sugar to crock pot and stir everyhting until well mixed. Cook on low 2-4 hours or until ready to serve.

Serve hot topped with roasted coconut.
Saturday, September 21, 2013

Lemon pudding

Ok everyone, this post is a little bit of a cheat. My husband announced that his favorite kind of pie is Sour Cream Raspberry. Who knew? after 5 yearrs I thought that was one thing I had down -- apple or cherry pie were the go-to-make every thing better-pies. Apparently not so much. He said he's never said anything because he's never seen them anywhere but Frontier Pies and that's out of business so he's settled for others.
Well, that got a bug going and I was determined to recreate his pie.  I even picked fresh raspberries.

BUT...This post isn't that pie :) The pie is coming soon. I made it. It was good but not THE pie. So, it's coming soon. However, after making the pie I had leftover lemon pudding, so I made us a fun little treat.
There is nothing fancy about this dessert. It probably shouldn't be blog-worthy. However, it's yummy, it took 5 minutes, it looks awesome and it was fun to have a "fancy" little treat on a friday night. So, next time you want to impress but want to keep it as simple as physically possible, here is your go-to.

{Ingredients}
1 package instant lemon pudding
2 cups COLD milk
raspberries, or berry of choice
mint leaves, optional

{Directions}
Pour milk into bowl, add pudding and whisk for 2 minutes. Let it sit for 5 minutes. It will be soft set. Yes, these are the directions on the pudding box. Pour into small individual cups, top with fruit and a mint sprig. chill until you are ready to dive in.

Yummy!

Come again!

Wednesday, September 11, 2013

Home grown-home canned, Dill pickles


We are growing cucumbers in our garden this year and when we got to the point that our entire kitchen was being taken over we decided that it was time to do something other than eat them for every meal. We just couldn't keep up. Do you grow cucmbers? I had no idea, they grow like zucchini and they get BIG F.A.S.T!!!!

Anyway, I'm not a big canner. I love to do my own jam but other than that, the few extra bucks in the store is so worth it to me.

However, when You have 900 cucumbers sitting on the counter (because you can't fit anymore in the fridge), you try your hand at some things :)

I am here to tell you today. I made my own pickles. 7 big ol' jars of them and they are DELICIOUS! I found the recipe online so here is the original link.

{Ingredients}
7 wide-mouth quart jars, lids & rings ( I did some wide mouth and some some not and trust me on this one, wide mouth is easier!)
fresh dill, heads & several inches of stems shaken free of bugs (or dried, just convert correctly!)
cucumber, washed, scrubbed
1 garlic clove (or more)

Brine:

8 1/2 cups water
2 1/4 cups white vinegar
1/2 cup pickling salt (Table salt works as a substitute for pickling salt if you don't have any)
{Directions}
GET ALL OF THIS GOING BEFORE FILLING THE JARS.
Wash 7 quart jars in hot, soapy water (or dishwasher), rinse and fill with hot water; set aside.
Fill canning kettle half-full with hottest tap water; set on burner over high heat.
In a medium saucepan, fit lids and rings together, cover with water, bring to a simmer.
In a large saucepan, bring water, vinegar and salt to boil; turn off the heat; set aside.
If using whole cucumbers, wash well. If using spears, cut cucumbers into spears.
Fill jars: place a layer of dill at the bottom of each jar, along with one garlic clove (if used), then TIGHTLY load the cukes into the jar to the NECK of the jar (depending on size you may get two nice layers with a few small cukes in the top--)---squeeze cukes into the jar tightly--uniform size helps; add a few TINY spriglets of dill at the top, too, and another garlic clove if desired.
Once jars are loaded, pour in the brine leaving half-inch head space in each jar.
Add lid and ring to each jar, tightening evenly.
Place jars into canner with water JUST to the necks of the jars.
Bring water ALMOST to a boil (about 15 minutes--depending on how fast it heats up).
Remove jars, set on a dish towel on the kitchen counter, cover with another dish towel & let cool.
Check for seal (indented lid), label jars or lids, store in cool dark cellar or cupboard.


NOTES: When washing/scrubbing cucumbers, sort them into piles by size. This really helps make your jars look nicer, if you have uniform sizes. And makes for easier packing, too.
**Because of my slight aversion to canning I don't actually own a canning kettle. I filled a stock pot half full instead and brought that to a boil. Follow directions exactly as they say, just as if you did have a canner, it works, promise!

These were so yummy! Thanks for stopping by!

Thursday, September 5, 2013

Restaurant Review: Emmet and Ethel's


Welcome to Emmett’s & Ethel’s

Emmett's and Ethel's
90 E Main Street, Lehi, UT 84043
801-753-0705
http://emmettsandethels.com/
$
1-Star
Family friendly, VERY casual


For those that aren't sure how this works, look HERE 


This place is a burger and Ice-cream joint. It's about the only mom-and-pop shop around and when we discovered it we were so excited. After trying it twice here is our opinion....
We found Emmett's and Ethel's shortly after moving to Lehi, UT and decided to try it for dinner one night. As we left we looked at each other and decided we were glad we had tried it but we probably didn't need to go back. The food was about the same as you would get at any normal fast-food joint but way more expensive. I will say though, Mr. Chef likes his fries and is quite picky with them. If they aren't great, they aren't worth it. These were NOT worth it. None of us even finished our meals. This first visit, however, we were impressed with the ice cream. They have specialty sundaes, shakes, malts etc. We shared a sundae (a black and tan to be exact) and it was really yummy. So, we decided that if we ever came back we would be back for dessert but that's it.

Fast forward and year or two...My little girl has been earning prizes with some charts she is working on. Well when she earned her first prize she asked if we could go get ice-cream to celebrate her accomplishment. We thought Emmett's and Ethel's could be fun. So, Labor Day afternoon we went to make a big deal of our little 3-year old.

As we walked in we should have taken into account all the red flags and walked right back out but we gave them the benefit of the doubt and went ahead and ordered. All the ice cream bins (?) were either almost gone, had a lid half way on them or were missing. It looked like they were closing or cleaning. I asked if they were doing either and the high-school kid at the counter looked super confused and said, no -- all of our ice cream is available, as he grabbed one of the lids off and threw it onto the counter behind him.
So my 3 yr. old really wanted chocolate ice cream, they were out. What? What ice cream parlor runs out of chocolate by 2:00PM? Well, she ended up choosing M&M and seemed pleased with what was coming so we didn't worry. We all ordered and sat down. As we walked to our table, however, our feet stuck to the floor the whole way there. The table was semi sticky too. GROSS!!!

When our order came the 2 sundaes ordered came several minutes before the kids ice cream cone. Lame. When hers finally came, there was only 1 M&M in the whole thing, it was at the very bottom and she never even saw it -- and it was FREEZER BURNED!!! Like, BADLY FREEZER BURNED. She didn't even come close to finishing it because it was straight vanilla ice cream with ice all over it.

We vowed then and there to NEVER RETURN.

On our way out Mr. Chef took our one year old to wash up in the bathroom and came out completely disgusted. He said he basically had to peel his feet off the floors, there was black stuff smeared all over the walls, it stunk and there were no paper towels. That was the final straw.

So - to sum it up. After spending ***$15**** on ice cream, (ridiculous!!!!!!!!) we had one of the worst experiences we have ever had at any restaurant.

Don't waste your time. It's over priced, gross and dirty. 


Parmesan Rock Fish

We love fish around our house. Even our girls, ages 1 and 3, gobble it right up and usually go for seconds. This recipe is so easy and fast, it's a great dinner on those nights that you want a yummy meal around the table but don't have much time.


 {Ingredients}
2 Rock Fish Fillets
1-2 Tbsp Unsalted Butter
Kosher salt to taste
1/4 C Parmesan Cheese, freshly grated


{Directions}
Preheat oven to 350 degrees. 
Pat fish dry and sprinkle kosher salt to taste. Generously sprinkle fish but it is overwhelming if you get too much. Use your judgement and remember play it safe, you can always add more after it's cooked. Set aside.
In an oven safe dish melt butter in oven. Once melted, place fish in dish, (did you hear that rhyme? ha ha) and cover with parmesan cheese. Make sure that fish does not overlap.
Bake 20-25 minutes.

Serve immediately.

This has already been repeated twice in the past 2 weeks at our house, hope you love it as much!

Brynn

Thursday, August 15, 2013

Restaurant Review: Bucket-o-Crawfish


Bucket-o-Crawfish
http://www.bucketocrawfish.com/images/bucket-o-crawfish-170.jpg1980 West 3500 South Suite #104
West Valley City, Utah 84119
(801) 419-0900
http://www.bucketocrawfish.com/
$$
5 star!!!
super casual, great for families, average noise

At first I was super hesitant with this dinner. I would consider myself a pretty adventurous eater and I am usually willing to try most anything but when we arrived I was a little hesitant. Our waiter explained everything to us and brought out a small sample - bonus points in my book, I hate ordering things that i'm not sold on. The crawfish (new to me) still has eyes, legs etc. and comes in a plastic bag, sauce and all, ready for you to dig in. So -- I tried the sample and immediately put my reservations behind me. It was delish! Here is a quick run-down of how it all works.

Step one: order your meat; You can choose from crawfish, shrimp, clam, muscle, snow crab and dungeness crab. Obviously, the fancier you go, the pricier it gets. 
Step two: order your sauce; Cajun, Garlic butter, lemon pepper and crazy mix of all of them (my favorite)
Step three: like it hot? pick your spice!
finally ORDER THE SWEET POTATO FRIES. Just trust me, okay?

and now for the fun part - all the tables are covered in plastic tablecloths. When your order is up they bring you a bib and DUMP YOUR FOOD RIGHT ON THE TABLE! What?! Does that go against everything you have ever learned at a restaurant? Yeah, me too. But, it was so. much. fun! We absolutely loved it! We tried a variety of crawfish and shrimp with several different sauces and we loved all of it. I'm not kidding on this, no plates, no silverware, LOADS of napkins (well, wet wipes) and a ton of fun!

Go try this if you are in the area. It is one we still talk about and want to take several of our friends for a little date night adventure!

Restaurant Review: Milagros

So we all love the tex-mex that is everywhere- Cafe Rio, Barbacoa, Chipotle - but in my opinion, true, legit, TASTY Mexican food is harder to come by.

*Don't worry i'm very aware that I might stand alone on this opinion, and that it probably goes back to my aversion of all things melted cheese...*

Well, Mexican Food taste buds prepare to GET. BLOWN. AWAY!!!!!!!!!!

Milagros in Orem, Utah is by far the BEST legit Mexican place, IN UTAH, ever!!! Although there are several street taco stands that come in as close second. I know I know, GASP! they are good, ok, don't judge :)

Anyway...here's the info:
For those that aren't sure how this works, look HERE

Milagros
970 W 800 N
Orem, UT 84057
801-655-1555
Monday  -  Saturday 11:00 am – 9:00 pm
http://milagrosutah.com/
$$
5-Star!
Family Friendly, average noise, casual but not out of place if you are dressed up. 

This restaurant prides themselves in serving LOCALLY FRESH food. That was one of my favorite parts of our experience. If they could get it fresh and local, they did. The food was phenomenal, the service was fast and really friendly, (even when my three year old threw her root beer on the floor) and the atmosphere was comfortable and classy. We were impressed that even though it was full the night we were there, the noise level was very acceptable and the whole ambiance was fun and comfortable.

Both Mr. Chef and I were super impressed and would highly recommend it.

Also, we both loved our food, the kids menu was yummy too and from the looks of other people's tables, can't go wrong on the menu. One recommendation though - when you go, try the grilled honey-injected onion ball. It was so delicious!

Go, try it out and let me know what you think!

Just as a side note, in April 2013, City Weekly voted Milagros as "Best Utah Mexican Food" 

Here is another review to help convince you.

Best Miraculous Mexican Cuisine

“Milagros, meaning “miracles” in Spanish, is a heavenly take on Mexican fare. This Orem restaurant was started by Dave Tuomisto, the restaurateur who also founded the popular Bajio chain. His newest dining destination is a restaurant that offers a sometimes-sweeter take on traditional Mexican cuisine, such as the seafood tacos that come with pineapple salsa and roasted-red-pepper chutney, or the popular grilled onion ball that’s injected with honey and spices while in the oven. You also can’t go wrong with Barry’s Pollo Fundido-a chicken breast wrapped lovingly in a fried tortilla and smothered with sour cream, cream cheese, Monterey Jack and cheddar cheeses along with a smattering of sumptuous chilies and spices.

Wednesday, August 7, 2013

Pesto Paninis

I love summer cooking; Barbeques, grills, fruit, fruit and more fruit! So last night I decided grilled sandwiches were in order. I have issues with melted cheese, serious issues. If it's too thick and I take a bite a bathroom better be close by, and regardless of how hungry I am, I'm done eating for the rest of the night. My husband thinks I'm crazy. What can I say, it's a texture thing.

So, normally paninis aren't really my thing. That whole melted cheese gets in the way. However, last night these were delicious. AND the best part about sandwiches is everyone can make theirs just how they want. For example, my sandwich has one thin layer of cheese but Mr. Chef can't get enough of that ooey goodness. To each their own.

Remember : Make yours with whatever you want! You could have paninis every day for a month and never have the same sandwich twice :)

So - I'm not giving you a recipe. These should be made to order, just how you want.
Go choose a delicious meat from your local deli, get some tasty cheese (experiment a little with this, we got a cheddar with red pepper in it) and slather on the pesto!


Monday, August 5, 2013

Restaurant Reviews: Introduction


OK -- Mr. Chef and I not only love to try new recipes but one of our favorite hobbies is trying new restaurants. We love finding a new gem where we can try new things and have a fun night out. For example -- a few weeks ago we were going to a local tried and true pizza place and as we drove our 3 year old started crying, hard, and screaming, "I don't want pizza! I want sushi!"
uh oh! So -- to her future dates, we are really sorry. She is officially ruined. 

Anyway, new, different, healthy (most of the time) food? Bring it on!

Here is the plan. I try and post a new recipe once a week and now in addition to that I will be reviewing a different restaurant weekly.
I will post all the normal details of the restaurant as well as using a 5-star rating system and a 4 $$ symbol system as follows:

(per person/includes entree, drink, tax and tip)
$ - Cheapo, under $10/person
$$ - Moderate, $11-$30/person
$$$ - Spendy, $31-$60/person
$$$$ - Splurge, $61+/person 

Thoughts? Isn't that exciting?! I hate going to a new restaurant and leaving disappointed. Hopefully this will help a little. There is one catch though. We live in Utah and not all of these places will be chains. So, to our Utah readers - maybe this one is for you. Hopefully there will be something for everyone with these reviews but we'll see.

Review #1 (isn't this so exciting!?)
***update: I've moved the Bucket-o-Crawfish review to it's own post for simplicity of finding it.

Thursday, July 18, 2013

Spinach Pesto

 Everyone needs a good quick pesto sauce recipe! Trust me on this one, it's yummy. 
There is a secret ingredient that you might never guess. Go ahead, read on and tell me if you guessed it! Dare ya ;)
I'm keeping this short and sweet today, enjoy!!!


As you can see I buy my spinach in bulk. Costco has yummy spinach, and LOTS OF IT, for cheap. I'll get that and make 4-5 batches at once. This is my favorite go-to sauce, for loads of options. It's especially good on those days spent at the pool, where we run home just in time to get dinner on the table as Mr. Chef walks in. It's like I had been slaving for hours over a fresh hot cooked meal :)

 To start, let's make one thing VERY clear...this is easy peasy.  
 Blend all the above ingredients, minus olive oil, together in your blender or food processor until creamy. Slowly add oil, while blending. 
Pour into ice cube trays or tupperware for storage. 

For some reason pesto will discolor after you freeze it. I don't honestly know why. To avoid it, simply pour a very thin layer of oil on top of the pesto in the container. 

This freezes really well or goes great on sandwiches, pizza, wraps, pasta...the options are endless! Maybe i'll do a pesto week next week and give lots of ideas for how to use your pesto? Anyone interested?


{Ingredients}
5 C loosely packed, fresh spinach
1/4 C Lemon juice
1-2 tsp grapefruit zest (any citrus will do but the grapefruit adds a really fun zing)
1/2 C pine nuts, toasted
1/3 C Olive Oil
salt and pepper to taste (I usually add about a full tsp of salt and 1/4-1/2 tsp freshly ground pepper)

{Directions}
Toast pine nuts in oven or toaster oven. spread them out in a single layer on a cookie sheet and toast at 250 degrees for 5-8 minutes, just long enough to enhance the flavor. When you open the oven door, you should be able to smell them. 
Place spinach (no need to de-stem but make sure it's washed well), lemon juice, pine nuts and grapefruit zest into blender or food processor. Blend until smooth. While still blending slowly add oil until well mixed. I usually prefer Olive Oil, however, this past time I made this I ran out of Olive Oil so I substituted Canola Oil. Whatever vegetable oil you have should work just fine. My personal preference is Olive. Add salt and pepper to taste. Use with your favorite recipe.

Optional use: Pour prepared pesto into ice cube trays or tupperware. Cover with a very thin layer of oil to preserve the bright green color while frozen. Freeze immediately.

PS - Did you guess the secret ingredient? Who would have thought, grapefruit pesto!?

Wednesday, July 3, 2013

Candy go-carts

This post is a little different. We are still making stuff in the kitchen, well actually the park, but it's still food. So, today is for the kiddos!

So -- today's post is a quick and fun idea when you are looking for a different day with the kids, or adults, or whoever. (we all got in on this action, maybe the adults more than the kids in some instances)

My little girl just turned three and was sure that ONLY a Fix it Felix party would do. Not Wreck it Ralph or Sugar Rush, Fix it Felix, complete with the building cake from the movie. Somehow I pulled it off and it was a blast and she was in heaven. But one of the most fun parts of the whole thing was making our own go carts. If you have a winco around you go hit them up for their bulk candy and go crazy!!!

Here is the birthday girls cart:

 We had a HUGE array of candies, cookies and crackers to use. Make sure that you get lots of round candies for different wheels and steering wheels. We also found that toothpicks were extremely handy!

And here are some other masterpieces...Aren't they beautiful!?


There are so many fun things you can do with this! Go grab candy of your choice, a few toothpicks, some awesome icing and go go-cart crazy!!!


Recipe for Royal Icing:
(recipe from Food Network)

{Ingredients}
3 egg whites
1 teaspoon vanilla extract
4 cups confectioners' sugar (powdered sugar)

{Directions}

In large bowl of stand mixer combine the egg whites and vanilla and beat until frothy. Add confectioners' sugar gradually and mix on low speed until sugar is incorporated and mixture is shiny. Turn speed up to high and beat until mixture forms stiff, glossy peaks. This should take approximately 5 to 7 minutes. Add food coloring, if desired. For immediate use, transfer icing to pastry bag or heavy duty storage bag and pipe as desired. If using storage bag, clip corner. Store in airtight container in refrigerator for up to 3 days.

Wednesday, June 12, 2013

Summer Balsamic Pasta

I've been so in the mood for fresh and fast since summer hit. This week especially! This dish hit the spot the other day and it was fast, easy and healthy.

So, without further delay - enjoy! Go work in the yard, go running, spend the day at the pool and then throw dinner on and feel great!


Cook about 1/3 cup dry pasta according to package directions. Sautee peppers and onion and steam broccoli. Combine pasta and veggies in bowl, sprinkle with feta cheese, salt and pepper and toss in a few shakes of balsamic vinegar. Serve with fresh fruit. That's it! Easy right?! And it's equally as delicious. Trust me!

{Ingredients}
1/3 C pasta
1/2 Red Pepper, chopped
2 Green Onions, diced
1 C fresh Broccoli, roughly chopped
Feta cheese, to taste
Salt to taste
Pepper to taste
1 Tbsp balsamic vinegar


Happy summer!

Wednesday, May 29, 2013

Vegetable Carbonara

Today's to-do list included about 7x what I was actually able to get done. So -- when Mr. Chef called to say he was on his way home, I was elated as usual but also realized what time it was and that I hadn't even THOUGHT about dinner. I usually try and time it so that I'm putting it on the table as he walks in. Was it going to happen? Mmm, maybe not today. 

Sometimes you just need a quick throw together meal that is healthy, in budget and fast. This, my friends, is it! This saved me tonight, was delicious and fit the bill for fast.

Vegetable Carbonara

{Ingredients}
2-3 strips of bacon, diced and cooked (add less or more here, to your liking)
1 1/2 C fresh Broccoli, cut into bite sized pieces
1 C chopped carrots
1 C mushrooms, sliced
1 red bell pepper, diced
2 C dry pasta, any shape
3/4 C freshly grated Parmesan Cheese
2 eggs
salt
freshly ground pepper

Cook pasta according to package. DO NOT LET THIS COOL!!! Carbonara is a pasta that needs to be finished immediately following draining the pasta. So, if you would prefer to prep everything else before the pasta so you are ready, great! Do what works for you but just be prepared that the pasta can not sit and wait for any amount of time. The egg won't cook if it does. 

Cook bacon, on low heat to enrich the flavor. Set aside -- LEAVE THE GREASE WITH THE BACON! (Which goes against every natural thing in me!)

Chop and saute peppers and mushrooms, add to bacon. Steam broccoli and carrots until tender, add to other ingredients. Grate Parmesan and add to these ingredients as well.
beat eggs lightly in small bowl. Drain pasta and quickly combine everything, including the egg. Stir constantly until egg is cooked (you can't really see that it's cooked, you can just see that it's not runny anymore), cheese is melted and pasta is thoroughly mixed. Season with salt and pepper.

Serve immediately, Bon Apetite !

*This was a huge success with everyone around this house including the 3 year old and 10 month old! Hopefully it will be with yours too :)

Thanks for stopping by!

Wednesday, May 15, 2013

Veggie Stir Fry

I am a carnivore. I love meat and would eat it for every meal every day. Lately however, meat hasn't really sounded good, like at all. Maybe it's because i'm trying to be healthier, maybe it's because healthy foods sound so refreshing in the summertime, maybe it's because I love veggies...whatever the reason - All i've wanted lately is veggies and barbequed food. So, the other night I was needing dinner in a hurry and had no idea what I was going to make. I had loads of veggies in my fridge so I threw them all together with some spices and had the most delicious stir fry ever. The best part, besides cooking the rice, dinner took like ten minutes! Keep reading for a fast yummy throw-together kindof dinner!


{Ingredients}
2 C cooked rice, I prefer brown but choose your favorite.
1 White onion, roughly chopped
1 Tbsp garlic, minced
2 C mushrooms, chopped
2 C fresh broccolli, chopped
1 red Bell Pepper, diced
1/2 C Soy sauce
1/8 C Worstershire sauce
1 tsp. garlic
1 sprig fresh rosemary
Salt and pepper to taste


Cook rice according to package directions. 
Roughly chop onion. Sautee onion and garlic in a dash of olive oil for a few minutes until pungent. Add mushrooms, broccoli, peppers, soy sauce, worstershire sauce and spices. Sautee 3-5 minutes until veggies and spices are mixed well. Cover for 3 minutes to steam veggies. Uncover and mix well.
Add rice to veggies, mix well and enjoy!