Wednesday, August 29, 2012

Love board

My cousin is marrying the cutest girl in a few weeks and the theme of their shower was "To fill their home". NATURALLY i assumed that meant decor. Apparently I was wrong in that thought :) But, that was included so i didn't totally miss the mark. Anyway, I made their gifts and was so excited by how they turned out! I have a pile of palletts sitting on the side of my house begging to be turned into a picnic table for our back yard. So, I broke of a slat of one of those and got started.

First I cut my pallet into 2 pieces, the size I wanted the sign to be. I don't have a big table saw or anything so i just used a regular hand saw. It went really fast with minimal effort.  I didn't have any nails that fit this project so I grabbed the sturdy wood glue and glued my boards together.

Next I chalked out where I wanted to write. Chalk is nice because it washes off really easily and will always come off. 
I found extra white paint and a foam brush and painted the word LOVE onto my boards. Finally I brushed one layer of stain onto the final dried project, just to add some character. It totally finished the project and i was stoked!

I painted the O in Love a heart and later covered it with fabric rosettes.


 DONE! Easy peasy! :)


Apricot-Almond Crunch Pie

Prepare to have your world ROCKED!!! I'm not kidding, this was amazing! Maybe my new favorite pie. Actually, not maybe, definitely my new favorite pie. MMM! I think I need another one, STAT!

So here is how this pie came to be. A neighbor of mine had a bajillion apricots and i bought a bunch off of her for an amazing deal, thank you Heather! But, in 5 minutes I went from oh let's get some apricots to a 5 pound box sitting on my counter, all ripe and ready to be devoured. 
Que: Pinterest. I searched for every apricot recipe I could find so that I could use them up before they got soft and squishy and gross. To be honest, there were loads of ideas on pinterest but they all sounded OK, nothing life changing. And we needed life changing. Strike One.
Que: The never fail cook book. Better Homes and Gardens, Thank You. Who has that red and white checked cook book?  Do you LOVE IT!!??!!??!!?? I use it for everything and I love it for everything! So, the filling comes from that cookbook and the crust is my grandmas AMAZING pie crust, seriously the best crust ever. It's delicious and flaky and light and oh so fattening. Perfect combo right?

Let's do this...
 Slice up your apricots-- You choose, I left the skin on. Mostly a laziness factor.
Prepare your topping and set aside. 
 
  Prepare the filling and set aside.

 Prepare and roll out your dough. Lay in pie plate and crimp as desired. I did two (see picture above and below). Fill each pie with filling.
 I used the bowl of a spoon for this design. It's super easy.

 Cover pie with crumb topping. It will seem like there is WAY too much topping, trust me, use it all! Finally top with almonds.

Pre-cooked. Doesn't this look divine?

Bake and feast!

I liked it better cool, my husband thought it was best hot, with ice cream of course :)

*And just a note, something you may want to remember and plan on...I made 2 pies. One for our family and one for my neighbors who were moving. I sadly, (or happily?) admit that pie number 2 never made it to their house. 
Oh yeah, it's that good :)

{CRUST RECIPE} (Makes 2 crusts, you will only need one for this pie)
2 C flour
1 tsp. salt
3/4 C butter-flavored shortening
3 Tbsp. water, chilled (add a few more drops if needed)

Mix flour and salt together. Measure shortening and set in bowl with flour. Set in refrigerator to chill. When chilled, mix together thoroughly with pastry cutter. Stir in water with fork, 1 Tbsp at a time, working dough gently and briefly. Divide into 2 halves, shaping each into a slightly flattened disk, Refrigerate one while you are rolling out the other. Roll out on lightly floured surface and place in pie plates. This recipe makes one two-crust pie or two one-crust pies. If for one-crust pies, prick with fork and bake at 450 degrees 10-12 minutes. 
*note: for ease of rolling out, use a cloth rolling pin cover and roll out on a pastry cloth. Always roll from the center outwards. 

{CRUMB TOPPING RECIPE}
Stir together 1/2 C all-purpose flour and 1/2 C packed brown sugar. Using a pastry blender, cut in 3 Tbsp butter till mixture resembles coarse crumbs.

{PIE RECIPE}
1 recipe Crumb Topping (above)  
3/4 C Sugar
1/3 C all-purpose flour
4 C sliced, pitted apricots ( I left the skin on, if you would prefer to peel them that works too)
2 Tbsp amaretto or 1/2 tsp. almond extract plus 2 Tbsp water
1/4 C slivered almonds

In a large mixing bowl combine sugar and flour. Add apricots and amaretto or almond extract/water. 
Transferr apricot mixture to pastry-lined pie plate. sprinkle Crumb Topping over the filling. Sprinkle with almonds. 

To prevent over-browning, cover edge of the pie with foil. Bake in a 375 degree oven for 25 minutes. Remove foil and bake an additional 20-25 minutes or until top is golden. Cool on a wire rack.

Tuesday, August 28, 2012

Fried Rice

Alright ladies and gents, sometimes you need a side that is delicious but different! do you guys get into the same rut that I do? Steamed veggies or brown rice with EVERYTHING!? Sometimes I don't even think about it, I just grab the rice or veggies and throw them onto the plate with whatever is for dinner. This side is fun, easy, delicious and fast! Our favorite is to serve it with potstickers for a fast dinner on those nights when you are rushing!


*Nothing in this recipe is measured -- it's all estimated, sorry :)

Cook your rice as normal (this recipe uses 2 1/2 C white rice, cooked. brown works too but doesn't get quite as sticky). While rice cooks, cook approximately 2-3 slices bacon cut into small bite size pieces (refer to the picture above if you are unsure) in large frying pan (I use a 12" pan and make enough rice to fill it, it's totally up to you though). When bacon is almost done add 1/4 C green onions (one batch). Cook for 3-4 minutes. Add cooked rice and stir everything together. Mix one egg into rice mixture until all the rice is well coated. Add 1/4-1/2 C soy sauce and 1/4 C water. Stir and cover. If you would like additional veggies, ie frozen peas, add those now. Let sit on medium low heat 10-12 minutes, stirring occasionally.When liquid is gone and consistency is where you like it, season with pepper and serve hot.

*Note: It will look runny and then pasty after the liquid has been added. Give it time -- it will improve.

Let me know how it goes!!!

Tuesday, July 24, 2012

Tin-Foil Tilapia

This is one of my very favorite meals. It tastes so fresh and healthy, it's fast and relatively mess free, clean up is basically non-existant and did I mention it's delicious!?

Well, to start - pick your favorite cut of fish...or beef, chicken, pork etc. This recipe is specifically for fish but it can EASILY be adapted! Lay fish in the center of a large square of tin foil. These are going to be cooked inside so no need to double wrap the foil. If you do cook these on a fire, I would recommend double wrapping to avoid burning.

Sprinkly your favorite spices generously over the fish. Tonight I patted the fish dry, rubbed it with  kosher salt (about 1Tbsp/filet) and pepper (1tsp/filet) then sprinkled Paprika, Lemon Pepper and Cayenne Pepper for a hint of spicy.

Top fish with veggies of your choice. I was seriously wishing that my veggies from my garden were ready because fresh tomatoes, zucchini, cucumber and onion would be AMAZING in here...however, the night I made this they weren't ready so we settled for frozen veggies from Costco.

Top everything with about 1Tbsp. butter (optional but it does improve the flavor) and wrap them up tightly! before you seal the last side, add about 1 Tbsp water to your little package. It helps steam the veggies and keeps everything moist. MMM!


Bake for 20 minutes in a 375 degree oven and enjoy. It is seriously that simple. Careful when you open them, that steam is toasty!!!


 VOILA! it's fresh, it's simple and clean up is easy-peasy!!!

Serve with some Parmesan black beans and garlic toast and you've got yourself a delicious dinner in no time flat!


Recipe:
2 Tilapia Filets
2 C vegetables of choice, diced or cut into bite sized pieces
2 T Kosher Salt, divided
2 tsp. fresh ground pepper, divided
Paprika, to taste
Lemon pepper, to taste
Cayenne Pepper, to taste
2 Tbsp butter, divided
2 Tbsp water, divided
Tin Foil

Place all ingredients in a square of foil. Wrap tightly and bake for 20 minutes at 375. unwrap and indulge. 

Friday, May 4, 2012

Steak Burritos

I'm a carnivore. Any night of the week, ask me what I would choose if I could have anything for dinner it will almost ALWAYS be steak or some other red meat. What can I say, I love it!!!
So a few weeks ago, (or maybe it was just one week? It feels a lot longer than that) my cutest neighbor and friend just moved and we already miss them so much! The week they were moving we took dinner over and were trying to figure out a menu that their kids and the adults would love. From what she said, this was a hit! Yay!!! Mr. Chef and I LOVED it and kindof already want to make it again. But, as I said earlier, steak for dinner? Yes please!

The actual cooking time was so fast and simple, the prep of all the little sides that go with the meat took a little more time but still not very consuming. Here are the goods...

{Ingredients}
2 lb. Flank Steak
1 C Water
2 T Brown Sugar
1 tsp. Chili Powder
1/2 tsp. Cumin
1/2 tsp. Ground Coriander
1/2 tsp. Cayenne Pepper (more or less to taste, i vote more but that's just me)
Kosher salt

Combine all ingredients, minus Kosher Salt and marinate steak overnight (or at least 6-8 hrs.), the longer the better!!!
When you are ready to cook the meat, take it out of the marinade and pat it dry. Sprinkle with Kosher Salt and grill it up!

Grill for 3-5 minutes on a VERY HOT grill (can you get your grill around 500 degrees? That's best but any high temp will do. The crust will just be thicker the hotter you go) to give it a bit of a crust, bring it in and finish cooking on a pan until no longer pink inside, about 5 more minutes on each side.

The crust on the outside is flavorful and delicious and the inside is tender and moist. MMM!!! enjoy on flour tortillas (the uncooked tortillas from Costco are our favorite but go with your favorite) with shredded cheese, lettuce, homemade Pico De Gallo, avocado, sour cream and anything else that you love! Goes great with a yummy salad or chips and salsa and some lemonade!

Enjoy!

(Pictures are on the computer that won't really work right now so they are coming soon!)

Monday, March 26, 2012

Poached Peaches and Cream

"Poached Peaches?" you say with a squirmish little face? It's ok, so did I when Mr. Chef presented his "appetizer" one night. Well, let me just tell you...Wipe that worried little look off your face and dig in! These babies are yummy yummy yummy and fast and easy and really pretty healthy!
My creative husband came up with these on a whim one night because we needed to use my COSTCO size tub of sour cream that I bought on a whim one night. Who buys Sour Cream at Costco when you don't have something specific to use it for and there are only 2 of you (i'm leaving out my 1 yr. old, she doesn't eat enough sour cream to count)? Well, apparently I do :)
So, go buy your sour cream at Costco, just for fun, and get your poachin' on!

{Ingredients}
1 15.25 oz. can peach halves in heavy syrup
2 tsp. lemon juice
2 tsp. vanilla
1 Tbsp. Brown Sugar
1/4 tsp. Allspice
1/4 tsp. ground nutmeg
1/4 tsp. cinnamon

Sauce:
1 C Sour Cream
2 Tbsp. sugar
1 tsp. vanilla

{Directions}
Drain peach syrup into shallow pan. Add lemon juice, vanilla and brown sugar. Cook on medium/high heat until warm, stirring until sugar dissolves completely. Add spices (Allspice, nutmeg and cinnamon).
Bring to a boil, stirring occasionally. Add peach halves, flat side down. Cover the pan but leave the lid open a crack. Allow to boil until sauce is about 1/2 it's original volume.

While boiling prepare sauce. Whip sour cream, 2 Tbsp sugar and 1 tsp vanilla together until soft peaks* form.

Serve sauce on top of peaches.

*Soft Peaks: When you turn your whisk upside down, the peaks are just starting to hold. They're soft and melt back into themselves after a second.You can go a little longer if you prefer and make "firm peaks" that are still soft but hold their shape.

Hope you all enjoy this as much as we did!

**serving suggestion: Make and serve these in individual ramekins with one peach half in each ramekin. This is the way we usually do it and it creates a more sophisticated feel. Kind-of fun :)


Tuesday, March 6, 2012

Chicken Fajitas

So, last night was a fajita night and a last minute fajita night. The nap was an essential part of the day but it started and ended a little later than planned, so when the husband called to say he's coming home, I went into fast crazy mode for fajitas. Go figure these were AMAZING!!! The original recipe called for 3/4lb sirloin steak but we substituted chicken thighs and it was so delicious!
I loved how easy this was and how much flavor they packed. So, here is a quick, easy, mostly all-on-hand recipe for those crazy nights.  

{Ingredients}
  • 2 chicken thighs, thawed and sliced into thin strips
  • 2 tablespoons olive oil
  • 1 tablespoon lime juice
  • 3 garlic clove, finely minced, divided
  • ½ teaspoon chili powder
  • ½ teaspoon cumin
  • ½ teaspoon hot pepper flakes
  • ½ teaspoon black pepper
  • ½ teaspoon salt
  • 3-4 flour tortillas (8 inch/20 cm)-- we love Costco's unbaked tortillas. 
  • 1 -2 onion , we usually use approx. 1-2 depending on size (however much you like,enough to make a good mix with the peppers)
  • 2 small bell peppers, of your choice (green, red, or yellow) 
{Topping Suggestions}
Salsa
sour cream
shredded cheese
chopped tomatoes
or serve them with just the sauteed veggies - they aren't lacking much. 

{Directions}

  1. Slice chicken into thin strips.
  2. In bowl, mix together 1 tablespoons olive oil, lime juice, 1 tsp garlic (1-2 cloves), chili powder, cumin, hot pepper flakes, black pepper & salt.
  3. Add chicken strips and stir to coat, set aside.
  4. Wrap tortillas in foil and place in 350° oven for 5-10 minutes or until heated through. (Cook tortillas just before you are ready to serve so they are soft and warm if you are using raw tortillas)
  5. Cut onions in half lengthwise and slice into strips, cut your peppers into strips.
  6. In large non stick skillet over medium high heat, heat remaining tablespoons of olive oil.
  7. Add (remaining)1 tsp. minced garlic and saute until fragrant. (approximately 1-2 cloves) 
  8. Add onions & peppers stirring for 3-4 minutes, until softened; transfer to a bowl and set aside.
  9. Add chicken to skillet, cook, stirring for 5-7 minutes or until they lose are cooked through and the juices start to thicken.
  10. Return onions and peppers to skillet; stir for about one minute.
  11. To serve, spoon a portion of the chicken mixture down the center of each tortilla, top with your desired toppings , fold bottom of tortilla up over filling, fold the sides in, overlapping.
We served these with chips and salsa and celery with ranch. Simple yet satisfying.

The original recipe was found on food.com

Wednesday, February 15, 2012

Oreo Chocolate Chip Cookie Cookies

These cookies were made totally by mistake. I was sending treats to a family party and had the cutest Halloween creations in mind for all the kids. So, I went to the store and couldn't quite justify spending the money on real Oreos because they were super expensive at the time. So, being the cheapskate I am, I bought the generic brand of Oreos. Luckily before I made my little treats I tasted an Oreo and it was AWFUL!!! I was so disappointed! The real thing was def. worth a few extra bucks. So, I looked for a recipe that I could use the gross Oreos in without it really ruining the treat. These were a success! I think real Oreos would probably be better and you can never go wrong with double-stuffed but this is one recipe that the generic brand didn't make a difference.

 First of all, for any that don't know...this is how I feel about Oreo's! Just so we are all clear :)


So, needless to say, these have been on the list of "to-post" for a very very long time! Like I said, I made these back in October for a family Halloween party and they were definitely a hit! (well, we couldn't actually make the party so that's hearsay but it came from several trusted sources so we'll go with it.)
My little helper, who was so mad when we baked these creations! You can call me a bad mom as soon as she gets Salmonella, until then, I'm the favorite mom. Got it?
Anyway, they turned out so pretty and were really fun to make! mmm, these cookies were one recipe that I really wanted to keep on my counter and accidentally make them disappear one by one. Actually funny story with these...My sister and brother-in-law were picking up the cookies and taking them to St. George for the party. They were running late and I had an appt. so I couldn't meet them when they would be passing my house so we arranged for me to hide them right off the freeway and they would grab and go. Yes, I hid a plate of homemade cookies behind a sign on the side of the road. Until I got her call confirming the pick-up, I kept hoping that MAYBE they wouldn't be able to find them and then, oh well, since they were on one of my favorite platters, i would HAVE to go pick them up and since we weren't going to St. George for Halloween we would HAVE to eat them all...dang, maybe next time :)
Enjoy these, they are gooey, soft, delicious and worth it.


Makes 20 - 30 cookies* 
(Recipe from http://mychocolatetherapy.blogspot.com/2010/10/oreo-cookie-cookies.html)
Ingredients:

  • 2 cups all-purpose flour
  • 1/2 teaspoon baking soda
  • 1/2 teaspoon salt
  • 3/4 cup unsalted butter, melted
  • 1 cup packed brown sugar
  • 1/2 cup white sugar
  • 1 tablespoon vanilla extract
  • 1 egg
  • 1 egg yolk
  • 2 cups semisweet chocolate chips
  • 20 oreos, crushed
Directions
  1. Preheat the oven to 325 degrees F (165 degrees C). Grease cookie sheets or line with parchment paper.
  2. Sift together the flour, baking soda and salt; set aside.
  3. In a medium bowl, cream together the melted butter, brown sugar and white sugar until well blended. Beat in the vanilla, egg, and egg yolk until light and creamy. Mix in the sifted ingredients until just blended.
  4. Add in the crushed oreos. Beat on low speed for just a few seconds to break up the oreos in the dough.
  5. Stir in the chocolate chips by hand using a wooden spoon. Drop cookie dough 1/4 cup at a time onto the prepared cookie sheets. Cookies should be about 3 inches apart.*
  6. Bake for 13 to 16 minutes in the preheated oven, or until the edges are lightly toasted. Cool on baking sheets for a few minutes before transferring to wire racks to cool completely.**

Friday, February 3, 2012

Beef Bourguignon

This recipe blew my mind! Both my husband and I kind of went crazy when we tasted this, it was so yummy and tasted like it was a lot more difficult to make than it was (which is always a plus). You can use stew beef or Venison (who regularly has venison? not us). Mr. chef and I LOVE LOVE LOVE steak and this was a really fun new recipe for using the frozen stew meat that we buy in bulk from Costco. Somehow, when we are there things like giant packages of meat always end up in our cart. MMM, why fight something that delicious?  We don't.
Anyway, make sure you give yourself enough time to prep it and then a few hours for cooking but the actual "hands-on" time was pretty simple.

MEAT MIXTURE:
1/2 to 1 lb. bacon, cut into strips 1/4 x 1 1/2 inch long
1 tbsp. olive oil
3-5 lbs. lean stewing beef or venison steak, cut in 2-inch cubes
2-3 sliced carrots
2 sm. onions, cut into ringlets
1 tsp. salt
1/4 tsp. pepper
2 tbsp. flour
Cook bacon until crispy, then add olive oil to saute bacon. Remove bacon. Saute beef or venison in "hot, smoking" oil. (Use dried beef and venison as it will brown nicer.) Remove meat. Saute carrot, onions in same fat. Add vegetables to beef mixture. Throw out remaining fat. Sprinkle meat mixture with flour and seasonings. Toss lightly in uncovered casserole dish in oven at 450 degrees for 4 minutes, mix. Return to oven for 4 minutes, mix again. Reduce temperature to 325 degrees.
WINE MIXTURE:
3 c. red wine (inexpensive)
2-3 c. beef stock or bouillon
1 tbsp. tomato paste
2 cloves garlic, mashed
1/2 tsp. thyme
Bay leaf, crumbled
1 lg. onion, chopped and sauteed
1 lb. mushrooms, quartered and sauteed (when we made this last week we left off the mushrooms because I was too lazy to go to the store ad it was still yummy)
Prepare 1/2 cup wine with remaining ingredients, mix well. Pour over meat. Combine remaining wine with bouillon. Mix into meat mixture so that it is covered. Cook slowly at 325 degrees for 2 1/2 to 3 hours until meat is tender.When ready to serve, saute mushrooms and onions. Distribute evenly over meat. Serve with mashed potatoes, noodles or rice (we used egg noodles and they were great). Decorate with parsley.

DIVINE.

Tuesday, January 24, 2012

Parmesan Black Beans

I feel funny posting this recipe because the first step is, Open and drain one can of black beans. Enjoy this, it's a great little side dish.


1 Can Black Beans, rinsed and drained
1/4 grated Parmesan (or Romano, or mixture of both) Cheese
Salt

Heat beans in a small sauce pan, stirring frequently
Add cheese and salt.
stir until heated through and cheese is melted, enjoy.

Goes great with Parmesan Crusted Pork Chops

Parmesan Crusted Pork Chops

I"M BACK!!! yay! This whole pregant thing has been killing me lately. Let's keep it simple and say, some of our dinners have been creative at best and NOT blog worthy! Ha ha don't be sorry you missed out. Food just hasn't sounded good ya know, my poor husband, who loves GOOD food almost as much as anything, has been a great sport though and I think i'm back in action. At least for today :)

Now, the latest love.

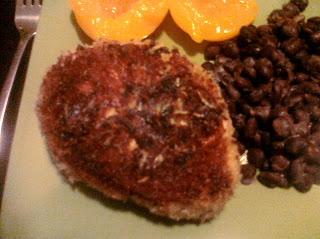
Parmesan Crusted Pork Chops with Parmesan Black Beans and Peaches. MMMMM!!!!!

This recipe was one of the easiest things i've ever made and was delicious. Best part, the whole house smelled like I was an insanely good cook, you should have seen the Mr's face when he walked in from work, a little smile and a sniff in the air. Pay off, right there. Make this. Tonight. and Tomorrow, and maybe the next day too....

Ingredients:
2 Boneless Pork Chops
Sour Cream (enough to coat chops, about 3/4 C)
Breadcrumbs to coat chops
a few shakes Basil, Rosemary and Thyme to add a little kick to the breadcrumbs, or just buy the Italian Flavored Breadcrumbs, that would be easier. 
3/4 C grated Romano/Parmesan Cheese. I mixed my cheeses and it was yummy but you could just do Parmesan if you wanted.
salt to taste
pepper to taste
Olive oil

Directions:
Place cheese in one pie plate, sour cream in one pie plate, breadcrumbs and spices in one pie plate. 
Dry pork chops and season both sides, thoroughly, with salt and pepper. Dip in cheese, make sure both sides are well coated. Dip in sour cream, again make sure both sides are well covered, and finally dip in breadcrumbs, making sure both sides are well covered. If your breadcrumbs aren't sticking very well throw them in the fridge for a few minutes and that should help.

*to make this dish a little lower cal substitute eggs (2) for the sour cream. I didn't have any eggs (I know who doesn't have eggs, we are in need of a grocery run in a BAD way) so I used sour cream and it helped keep the pork chops super tender. You choose. 

Heat oil in skillet over medium heat and cook Pork Chops through, about 6 minutes on each side.

(*If you are opposed to eating pork I think this recipe would make some amazing chicken too)

Done.
Can you say EASY!!!!!!!!
Enjoy this recipe, we loved it, let me know what you thought!