Wednesday, December 10, 2014

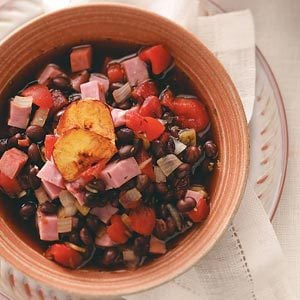
Ham and Black Bean Soup

Hello again! I'm so sorry that it has been so long. I'll spare you my excuses, just know i'm back.

We always buy a turkey and a ham this time of year and have one main meal and then LOTS of leftover meals with the meat. So, the ham was cooked and thoroughly enjoyed last weekend and now we are onto the leftover meals.

Enter: Ham and Black Bean Soup

Usually I am not a huge fan of Ham and Black Bean Soup. I think it's a texture thing. This recipe, however, blew me away. I thought it was absolutely delicious, my husband thought it was delicious and my in-laws gave a ringing endorsement as well.

source

Enjoy!

3 cans (15 oz each) black beans, rinsed and drained
28 oz. beef broth. - I use Beef Better than Bouillon
1 can (14.5 oz.) diced tomatoes, undrained
2+ Cups cubed, fully cooked ham (or to taste)
1/2 cup green enchilada sauce, mild
1/4 cup red wine vinegar
1 large onion, chopped
3 garlic cloves, minced
1 teaspoon dried oregano
1 tsp dried thyme
1 tsp pepper
salt to taste

Combine all ingredients in a large pot and bring to a boil. Turn temperature to low and simmer for 3+ hours.
Delicious served with Biscuits Supreme.
Recipe based off Taste of Home.

Just a tip: Leftover soup was just as delicious!

Biscuits Supreme, Better Homes and Gardens

Better Homes and Gardens red and white checked cookbook is my absolute go-to when I need a new recipe, or anything else cooking related. Especially their biscuits. They are soft, fluffy, buttery and divine. Make them and do a quick taste test. Let me know!


2 cups flour (white, wheat or half and half. They all work)
2 tsp sugar
1 Tbsp baking powder
1/2 tsp cream of tartar 
1/4 tsp salt
1/2 cup butter, margarine or shortening
2/3 cup milk
source

Preheat oven to 450

Combine dry ingredients. Cut in butter till mixture resembles coarse crumbs. Make a well in the center. Add 2/3 cup milk all at once; stir until moistened.

Turn dough out onto a lightly floured surface. Quickly knead dough by gently folding and pressing dough 10-12 strokes or till nearly smooth. Pat or lightly roll dough to 1/2 inch thickness. Cut dough with a 2.5 inch biscuit cutter.

Place biscuits 1 inch apart on an ungreased baking sheet.  Bake for 10-12 minutes or until golden brown. Serve hot. Makes 10 biscuits

Tuesday, April 8, 2014

Beer Bread

This recipe is straight from Food.com. I wish I could claim this concoction as my own because it is DELICIOUS but I can't. I can't even claim that it's based off another -- don't change anything! It is perfect just as it is! and the best part, minus cooking, it takes a total of 3 minutes and 1 bowl! Easy Peasy.

I don't drink alcohol so I never have beer in my fridge. For this, however, I bought a 6-pack and thoroughly enjoyed every last drop in this bread. (For those like me who don't drink, the alcohol cooks out but the flavor and the yeast are important. Yes, you can use a non-alcoholic liquid but make sure you use yeast or you'll get something resembling a large pancake as thick as your pan.)

I served a mission for The Church of Jesus Christ of Latter Day Saints in Ireland several years ago. So, this past month, (while feeling slightly homesick for my Ireland with St. Patrick's Day and all) I made lots of food that reminded me of those few years almost a decade ago. SO...choose any beer you want, I chose Guinness. Because how much more Irish can you get?!

AND...just a quick side note that is VERY IMPORTANT...THIS MAKES THE ABSOLUTE BEST FRENCH TOAST EVER!!! Make at least two loaves, one to eat for dinner and one for a french toast breakfast! (I would recommend more than two, just sayin'. It's that good.)

{Ingredients}
  • 3 cups flour (sifted)
  • 3 teaspoons baking powder (omit if using Self-Rising Flour)
  • 1 teaspoon salt (omit if using Self-Rising Flour)
  • 1/4 cup sugar
  • 1 (12 ounce) cans beer
  • 1/4 cup melted butter (the original recipe calls for 1/2 cup but that felt excessive to me, 1/4 was plenty)  
 {Directions}
  1. Preheat oven to 375 degrees.
  2. Mix dry ingredients and beer.
  3. Pour into a greased loaf pan.
  4. Pour melted butter over mixture.
  5. Bake 1 hour, remove from pan and cool for at least 15 minutes.
  6. ***UPDATED NOTES: This recipe makes a very hearty bread with a crunchy, buttery crust. If you prefer a softer crust (like a traditional bread) mix the butter into the batter instead of pouring it over the top. (leave it crunchy! trust me)
  7. Sifting flour for bread recipes is a must-do. Most people just scoop the 1 cup measure in the flour canister and level it off. That compacts the flour and will turn your bread into a "hard biscuit" as some have described. That's because they aren't sifting their flour! If you do not have a sifter, use a spoon to spoon the flour into the 1 cup measure. Try it once the "correct" way and you will see an amazing difference in the end product.
  8. I have had many email from you kind folks about using non-alcoholic beverages instead of beer. That is fine to do but I highly recommend adding a packet of Dry Active Yeast or 2 teaspoons of Bread (Machine) Yeast so that you get a proper rise.
  9. The final result should be a thick, hearty and very tasteful bread, NOT A BRICK! ;).
 (These directions/notes are taken directly from HERE.)

I'd love to know what you think! Hope you enjoy it as much as I do!
source

Wednesday, November 27, 2013

Thanksgiving Turkey and Stuffing

Happy Thanksgiving again! Can you all hardly wait for those delicious traditions to happen again? I love Thanksgiving. The family, the food, the shopping in the middle of the night...it's just a fun holiday.
So, for those who don't have their final plans for the turkey and stuffing here is your last stop. This is delicious (tried and true) and turns out beautifully. 


 I hope everyone enjoys their holiday this weekend. And good luck with whatever part of the feast you are in charge of!!!


*Side note: For those who are appalled by cooking the stuffing OUTSIDE the turkey -- be warned. (Dad!) You will be directed to do so. If you cook the turkey stuffed you will almost for sure overcook your turkey or under-cook your stuffing. If stuffing is undercooked it can be a fabulous place for food poisoning. If you overcook your turkey it gets dry. Lose-lose. So here is the trick. Cook your stuffing outside of your turkey (*GASP*) and cook your turkey until it is perfectly done. Have your stuffing ready so that the second the turkey comes out, you can stuff the turkey. In the 15-20 minutes that the turkey needs to sit the stuffing will absorb the juices from the inside of the turkey that would otherwise be wasted during carving. This will give it that yummy turkey flavor. It works. We tried it. DO IT! (And don't judge me for this tip, just sayin')


 {Ingredients}
1 10-14 lb. Turkey (completely thawed)
1 cube (1/2 cup) butter
2 tsp. Kosher salt
1/2 tsp. ground black pepper
1 tsp. rosemary leaves
1 tsp. thyme leaves
1 tsp. granulated garlic
1 tsp. ground sage
2 tbsp. olive oil
2-3 cups prepared stuffing

  • Melt the butter
  • Add  salt, pepper, rosemary, thyme, garlic and sage to the melted butter. Stir together well.
  • Using your hand and/or a paring knife, separate the skin of the turkey from the body of the turkey, leaving the skin intact.
  • Spread the butter mixture between the skin of the turkey and the body of the turkey, covering thoroughly.
  • Brush the skin of the turkey with olive oil.
  • Roast the turkey in a shallow roasting pan at 325° until the deep thigh meat reaches 180°
  • Remove from oven, stuff immediately with prepared stuffing.
  • Allow to rest for 20-30 minutes before carving.

HAPPY THANKSGIVING!

Cranberry Relish

 Happy Thanksgiving! I know this is a little last minute but this relish is so delicious that it just had to be shared. Cranberry sauce always gets thrown away (at least in my experience) but this stuff is far from trash worthy! So, enjoy your feast and try this out this year. You won't be sorry.


{Ingredients}
1 Cup whole cranberries
peel of 2 clementine oranges (or one large orange)
1/3 C water
1/4 C sugar

{Directions}
Blend all ingredients. Easy Peasy!
Serve with your turkey and all the fixings.

Enjoy!


Wednesday, October 30, 2013

Panzanella With Chicken, Crisp Chicken Skin and Capers

Mr Chef loves to read articles. He found this gem and we tried it out. We didn't change anything so I can't claim it as my own. HERE is the original article.

It's absolutely delicious and is definitely on our "repeat" list. Try it out and let me know what you think!!!


{Ingredients}

  • 1 1/4 pounds very ripe tomatoes; a mix of varieties and colors is nice
  • 2 garlic cloves, peeled and smashed
  • 3/4 teaspoon kosher sea salt, more to taste
  • 6 tablespoons plus 1 teaspoon olive oil, more as needed
  • 1 tablespoon lemon juice
  • 1/2 teaspoon Dijon mustard
  • Freshly ground black pepper, to taste
  • 2 cups leftover or rotisserie chicken including some skin (about 1/2 chicken)
  • 1 tablespoon capers, drained and patted dry
  • 1 6-inch length of ciabatta or baguette (about 4 ounces), preferably stale, cut into 1-inch cubes
  • 3 sprigs fresh thyme or 2 sprigs fresh oregano
  • Chopped fresh basil, for serving

Preparation

  1. Cut tomatoes into bite-sized pieces and transfer to a large bowl. Using a large chef’s knife, mince 1 of the smashed garlic cloves. Add a pinch of salt and using the flat side of your knife, smash into a fine paste. Add garlic paste to the tomatoes along with 1/4 teaspoon salt and 1 tablespoon olive oil. Toss to coat and set aside.
  2. In a medium bowl, combine the lemon juice, mustard, 1/4 teaspoon salt and black pepper to taste. While whisking constantly, slowly drizzle in 3 tablespoons olive oil until the mixture is thickened. Remove the skin from the chicken, shred the meat and combine with the vinaigrette. Roughly chop the chicken skin and set aside.
  3. In a 10-inch skillet over high heat, add 1 teaspoon olive oil. When oil is shimmering, add the chicken skin and capers. Cook while stirring occasionally until the skin is crisp and the capers are beginning to brown, about 4 minutes. Transfer to a plate lined with paper towels to drain any excess oil.
  4. In the same pan over medium heat, add 2 tablespoons olive oil, bread cubes, the remaining smashed garlic clove, 1 sprig of fresh thyme or 1 sprig of fresh oregano and 1/4 teaspoon salt. Cook while stirring occasionally until toasted and golden, about 5 minutes. Remove from the heat and cool completely. When cool, discard the garlic and thyme and add bread cubes to the tomato mixture. Add the leaves of the remaining uncooked thyme or oregano, the shredded chicken and toss to combine. Transfer to a platter or individual plates and serve garnished with the capers, chicken skin, chopped basil, and freshly ground black pepper.
YIELD
4 servings

Tuesday, October 1, 2013

Roasted butternut squash curried soup

source

Our garden produced an abundance of DELICIOUS butternut squash this year so i've been experimenting, for the first time, with different ways of cooking them. They are so yummy and are quickly becoming my favorite vegetable.
So, the whole family came down for Sunday dinner this past week and guess who was featured?  Good old Butternut Squash herself! Shocking, i know! ;)

We served this soup in bread bowls and it was so yummy. I would highly recommend that.

Let get right to it, shall we?
Start by roasting your squash, onion, garlic and ginger. We left our squash in the peel, purely out of laziness, and then scooped it out when it was soft. It was really easy that way. Cut the squash into peiices, at least halves, maybe thirds. Cut the onion into quarters and sprinkle the others all over. We roasted for 2 hours. This one is up to you, however. When your squash smells divine and is soft, it's done.
While that is roasting pat your stew beef dry and shake it in flour, garlic, kosher salt and pepper. Brown the meat in a little oil. You don't want your meat all the way cooked, just browned, to add flavor. Make sure your oil is nice and hot before throwing these babies on the pan. Remove the meat from your pan and deglaze the pan with your stock. Scrape it pretty well so you get all the meat that stuck to the pan. (This is usually the best part of the meat.) Place meat and your stock in the crockpot and let them cook while your squash cooks. This will get your broth all delicious and stuff.   When your squash is done puree it in a blender along with the onion and some of the broth. This needs to be done in batches but when it's all smooth it's going to give your soup such a perfect texture, so make sure all the chunks are gone! Add pureed squash/onion/broth to crockpot and add all the remaining ingredients. Let it cook for 2-4 hours on low and serve HOT! This is delicious topped with toasted coconut!
MMM, I bet you know what's for dinner tonight, eh?!

Enjoy, i'd love to hear what you think!

source


{Ingredients}
2 butternut Squash
2 sweet yellow onions
2 Tbsp garlic
1 Tbsp ginger

stew beef -
2 Tbsp flour
1 tsp garlic powder
1 Tbsp kosher salt
1/2 tsp black pepper

6 C beef broth

1 can coconut milk
1/2 C buttermilk
1 Tbsp salt
2 tsp white pepper
2 curry powder (yellow)
2 tsp cinnamon
1/2 tsp nutmeg
1 Tbsp brown sugar

Roasted coconut

{Directions}
Cut squash into halves, thirds or quarters - depending on the size of your squash. Place open faced on cookie sheet. Cut onion into quarters and spread on cookie sheet around squash. Sprinkle squash and onion with ginger and garlic. Roast the butternut squash, onions, garlic and ginger in a 450 degree oven for 2 hours. 
Meanwhile, pat beef dry. Combine flour, garlic powder, salt and pepper in large Ziploc bag. Coat beef with flour mixture, brown meat in a HOT pan. Remove meat and use beef broth to deglaze the pan the meat was browned in. Add the meat and broth to Crockpot and allow to cook on low until squash is done.

When squash is done, scoop squash out of peel and, in batches, puree squash and onions with some of the broth until creamy and smooth. add all back to Crockpot.  Add coconut milk, buttermilk, salt, white pepper, curry powder (yellow), cinnamon, nutmeg and brown sugar to crock pot and stir everyhting until well mixed. Cook on low 2-4 hours or until ready to serve.

Serve hot topped with roasted coconut.